Making Custom Optics Views for Operation Flashpoint
This tutorial will help you create
custom iron sights or scope views
for your Operation Flashpoint weapon addon. These instructions are
based on Photoshop 7.0, but additional instructions are provided for
Photoshop 5.5 which should also apply to older versions.
A custom optic view requires two image files and a P3D model file
created in Oxygen. The first image is your optic view, and the second
is the muzzle flash as it should look when seen though the optic view.
The model file is simply two squares which will be textured with the
two images.
To save you some time, I have extracted the optika_mildot.P3D and
textures from the FIL0 M24 Addon by HuBBa and Skaven.
I've renamed the model file and mapped my demo scope texture to it.
This file
is required to work through the tutorial.
1. Image Size
Begin with an image size of 512x683 or
1024x1346.
The proper ratio for our optic image is 800x600, the standard
proportion for Windows displays. It's best to begin working with an
image in these proportions. To match our image to the contraints of
OFP, we can resize the final image to 512x512 or 1024x1024. It will
cause image to squish horizontally, but then it will look right again
when stretched to fit the 8x6 square in Oxygen.
2. Set Guides for Image Center
Before we start making scope shapes, we
need to find the center of the
image, otherwise our scope will not be properly adjusted. We can create
some guides that will intersect at the center.
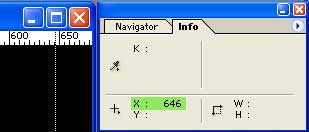
- Display the rulers, View > Rulers.
- Click on the info tab to display cursor coordinates.
- Move your cursor into the vertical ruler area and drag out into the
image area. You will have a new guide.
- Look at the info panel to see your guide's X coords. You want it to
be at the halfway mark. My exampleimage is 683x512, so I will drop a
guide at 341.
- Do the same for the horizontal ruler, dropping a guide at 256.
To move guides, you need to use the Move Tool (V). To remove them, just
drag them off the image.
Photoshop lets us work in layers, so we
can keep different elements of
the image on different layers. I will use four layers for my scope, one
for each of the following:
- Mask (the black around the screen)
- Crosshairs
- Glass effect
- Dust and scratches
A Photoshop image starts with a white background layer by default. This
is a special layer that is locked in the background, and can never be
transparent. Since we want our scope to have transparency, we need to
create new layers then delete the background layer.
- Create four new layers, Layer > New > Layer...
- Select the Background Layer and delete it, Layer > Delete >
Layer.
Your image should now display a grey and white checkerboard pattern.
This pattern means the RGB channels are all transparent.
4. Create Mask
Now we can create the black section which
will mask our view in-game.
- Select the layer at the top of the list in the Layer panel.
- Fill this layer with black, Edit > Fill > Black.
- Select the Elliptical Marquee tool (M). If you don't see it, click
and hold the button for the Rectangular Marquee tool.
- Place the cursor at the center of the image. You won't notice the
snap-to-guide effect until you click to begin the selection shape.
- To constrain the selection to a circle, and to have the circle expand
from center, hold Shift+Alt when you drag out the selection.
- Drag the selection to an appropriate size.
The selection area currenly has sharp edges, you may prefer to have a
faded edge.
- Feather the edges of the selection, Select > Feather > Set
radius in pixels. 8px works well for a 683x512 image.
- Hit the Delete key to clear the selected area.
5. Create Crosshairs
Now it's time to create crosshairs. This
can be done in a number of
ways. You can copy an image off the net, but they are usually low
quality and won't look good. If you use Adobe Illustrator, you may find
it easier to create an image there and import the shape into Photoshop.
Otherwise, you will have to use the meagre shape tools available in
Photoshop. Choose the layer below your mask layer.
For my demo scope, I'm just going to make simple crosshairs.
- Use the Single [vertical] Row Marquee tool and move the selection
inline with the vertical guide.
- Use the Single [Horizontal] Row Marquee tool, hold Shift to add to
selection, and move it inline with the horizontal guide.
- Expand the selection, Select > Modify > Expand:4px
- Fill the selection with black to make some very thick crosshairs,
Edit > Fill > Use:Black.
- Use the Rectangular Marquee tool, hold Alt+Shift while dragging the
selection from image center. It should create a perfect square in
center. Expand it until it is a little bit smaller than the circle of
the Mask Layer.
- Clear the selection by hitting Delete.
- Remake the thin crosshairs, but this time don't expand the selection.
Just fill the thin selections with black.
That's all we need for crosshairs. You can add details such as numbers
or text if you like.
6. Add Lens Effect
You probably noticed that optics in
Flashpoint seem to have a glass
effect. To achieve this, we work in next layer below the crosshairs.
- Select white or very light blue for your foreground colour.
- Fill the layer, Edit > Fill > Use:Foreground
Now we've got a solid blue lens, which isn't very good. We will need a
new layer with a Flashpoint screenshot, just to judge the look of our
lens.
- Find a good screenshot from OFP, I've provided one for you in the
download.
- Open the image in Photoshop, Edit > Select All (Ctrl+A), Edit >
Copy (Ctrl+C).
- Go to your scope image and Paste the screenshot (Ctrl+V).
- Move the new layer to the bottom of the list.
- Select your blue lens layer.
- In the Layers panel, find the Opacity slider, and reduce the opacity
of the lens layer until you are happy with it.
Be subtle, 3-5% opacity on this layer is about all you need. Any more
and you will find that it washes out the player's view ingame.
7. Add Dust and Scratches
We can add a few tiny specs to the lens,
like OFP's binoculars, to give
the scope view a good effect. Again, don't go nuts, just a few specs is
enough. You might want to add a temporary black layer underneath the
dust layer, so that you can easily see the light marks that you are
drawing, but it's not necessary
- Choose the last empty layer and move it on top of the blue lens
layer. Your layer order should look like this:
- Using a fine brush, draw a few tiny scratches and specks in whatever
colour you want.
- Adjust layer opacity to your preference.
- Delete the screenshot layer since it is no longer needed.
This completes the look of the scope.
8. Convert to TGA then to PAA
Here comes the important differences
between Photoshop 5.5 and
Photoshop 7. I'm not certain how Photoshop 6 handles transparency. As
far as Photoshop 7 is concerned, we are ready to save this as a TGA and
it will automatically save the transparency data into an Alpha Channel.
For Photoshop 5, we need to manually create the Alpha channel.
- Merge all layers into one, Layer > Merge Visible
- Switch to the Channels panel
- Load the RGB channel as a selection, click the little circle button
at the bottom of the Channel panel
- Create an Alpha channel, click the little page button at the bottom
of the Channel panel.
- Clear the selection by hitting the Delete key.
- Deselect, (Ctrl+D)
- Invert the image, Image > Adjustments > Invert.
That's all we need to get older versions of Photoshop to save the Alpha
data into a TGA. Now lets squish our image down to the proportions we
need for Operation Flashpoint.
- Image > Image Size... > Disable 'constrain proportions' and
change the width to 512. The height should remain 512.
- Save the image as a 32-Bit TGA (If you use 24-Bit, TexView won't
recognize the alpha channel).
- Open the TGA with TexView and save as a PAA.
9. Assign Textures to P3D Objects
Now we can assign the new texture to the
p3d model.
- Move the PAA texture file to your weapon's folder in the O2_Viewer
folder.
- Copy the demo_optic.p3d file provided in the download to the same
location, rename it to something appropriate.
- Copy the front_flash.paa texture to the same location. You can create
a new flash texture if you like, using the same alpha channel skills
you just applied to making the scope view texture.
- Start Oxygen Light and open the p3d model in your weapon's folder.
- Select the taller square and hit E to bring up the face properties
dialog.
- click the folder button in the bottom right corner to brower to your
texture.
- Make sure you hit the Apply button to save the changes.
- If you made a new flash texture, repeat the same process for the
smaller square.
- Preview the changes in Buldozer.
- Save the p3d.
10. Final steps
In your weapons config.cpp file, change
the optic filename to match
your new p3d file.
Now you're ready to compress the addon into a PBO and test it in the
game - Good luck!
Now you've got the basics, but don't stop there! There's lots of
possibilities. Here's a concept sketch and the final optics view for my
Trijicon ACOG 4x scope:
It will be released in the near future with my SR-47 beta addon.
As a final word, thanks to HuBBa and Skaven at OFPEC for the original
P3D and textures, which I extracted from the FILO M24 in order to
figure all this out.
There is also included a sample file pack (feel free to use and test it :o).